A belated devlog
Tombultuous is the game I am currently working on and one with a larger scope than my other games so far. It originally served as a challenge to create a source engine like movement system. Source movement is a system I love, and it made mundane tasks like jumping between 2 rocks a smooth, flowing and exciting experience.
But now that I’d made a great feeling neutral movement system what is there to do? Break it of course, and what better way to break it is there other than a rogue like game?
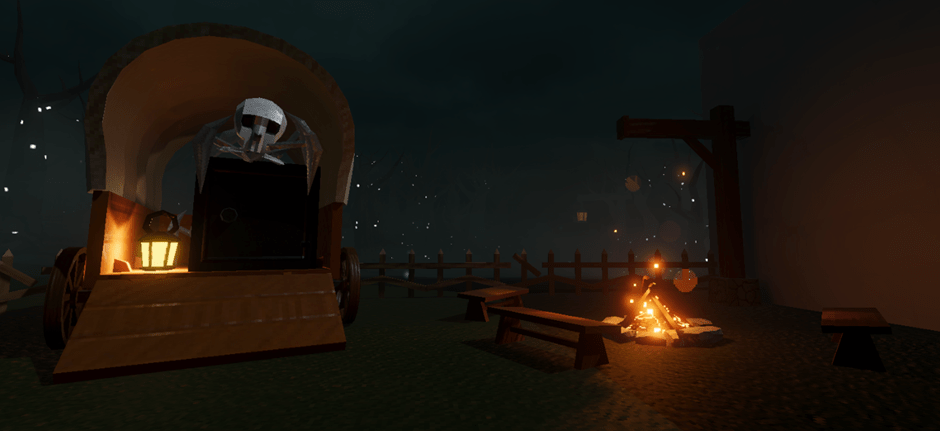
Tombultuous is an FPS roguelike game set in a light-hearted spooky fantasy Halloween setting. The development of this game serves not only to make a game I would enjoy playing, but also serves as an opportunity to learn how to design and develop features and mechanics I haven’t had a chance to make yet. The game is being developed in Unity.
The player takes the role of a graverobber delving the depths of a newly discovered tomb. Fighting off its skeletal denizens and hoarding as much gold as possible.
Three major elements of this game I have had little experience working with. These, namely, being complex enemy AI, Procedural level creation, and cross-scene persistent items and objects. That last one is a doozy because it combines 2 sub-elements I haven’t much experience toying with (creative and flexible items and persistence).
This game is being developed mostly solo and because of that I am limited by my artistic skills. Fortunately, I have found a style that turns my incompetence into a strength. The art style this game uses highly stylised pixel textures that make heavy use of normal maps and emission/reflectivity. Because of this I can get away with lower polygon less realistic models. A distinction needs to be made between low-poly and this style, however. More traditional Low-Poly emphasises sharp edges and visible triangles as part of the style. My style doesn’t, or doesn’t intentionally at least.
As this is a belated devlog, and belated is an understatement. There’s a lot to cover in this entry. So much so I’m adding a table of contents to make navigation not terrible.
Procedural level generation
Due this game being a roguelike replayability is king. A procedural level is almost a necessity in facilitating this.
The procedural part
I had always envisioned the procedural generation to take the form of stitching pre-designed rooms together. There were only a few requirements I would not compromise on:
- The rooms must be spawned after the final layout is created (I wanted this because if there were any errors in creating the layout the game could try again without wasting system resources on the Unity’s expensive instantiate.)
- Rooms had to have flexible shapes. (As long as there was more variety than a identically sized square room I was happy)
I had made an early prototype where a room would be spawned from the doorway of a previous room, in the nature of a random walk. I originally tried it this way because I believed it would allow me design flexibility in the shape, size and rotation of the rooms.
This method worked well for identical square sized rooms, but I started running into issues very quickly. Even with the prototype square rooms I was starting to run into issues determining whether a room had the area necessary to spawn (i.e., not clipping with other rooms). All of the methods that could have been used to solve this didn’t seem reasonable or would require an entire rebuild of the system to function. Which is exactly what happened. Over the course of trying to cover up every hole that appeared the system was becoming more and more like a grid. To put down a room you’d have to check where all that rooms doors would appear and make sure none other was in that same place with the same rotation, it was a confusing mess that was inflexible and difficult to troubleshoot. The exact opposite of what it was supposed to do. In the final working form allowed for 1×1 sized rooms and L shaped rooms that fit in a 2×2 footprint.
I elected to cut my losses with the old system and scrap it. I bit the bullet and started working on a grid system because it would be easier and more flexible. Now instead of arbitrary doorway locations and room locations constantly being sabotaged by float point number issues everything was abstracted as an integer grid. The spawn room would exist on position (0,0) the room directly to the right of it would be (1,0).
Each point of on the grid would be given a self-explanatory state (e.g., Available, Occupied, Forbidden etc.) Rooms could be any size (as long as they are a rectangle of size n x m). Surprising, with this new and improved system I had lost the ability to do L shaped rooms. I should be able to get them back but that’s something to do in the future.
The room spawning system chooses a random available room in the grid, chooses a random shaped room (of the available room sizes). It then sees if it is allowed to place the aforementioned room in any orientation around the chosen spawn position. If it cannot it gives up and tries another random position. But if it can it declares the chosen position “Occupied” along with its shape and its orientation. If the room is a rectangle the remaining spaces it covers are declared as “Multigrid” and are given a room ID to hold, this will become useful later.
When a room is spawned all its adjacent empty spaces become available, this allows the random walk to, well, randomly walk. However, if an adjacent space is already available it becomes “Unlikely”. Unlikely spaces are, for all intensively purposes, the same as available spaces. However, if a room wishes to spawn from one, it must pass a percentage check. This disincentives the random walk to create a mass of rooms centred on the start but instead spread out a bit more, creating more corridors. Multigrid rooms do not care about the unlikeliness when it comes to their sections outside the spawn, because of that the percentage check for unlikely rooms is set very low to compensate.
After all the rooms are spawned the furthest room from the spawn (in Euclid distance) is found and a boss room is created adjacent to it. All the “end rooms” are also calculated and the 1×1 of them get the opportunity to become treasure rooms.
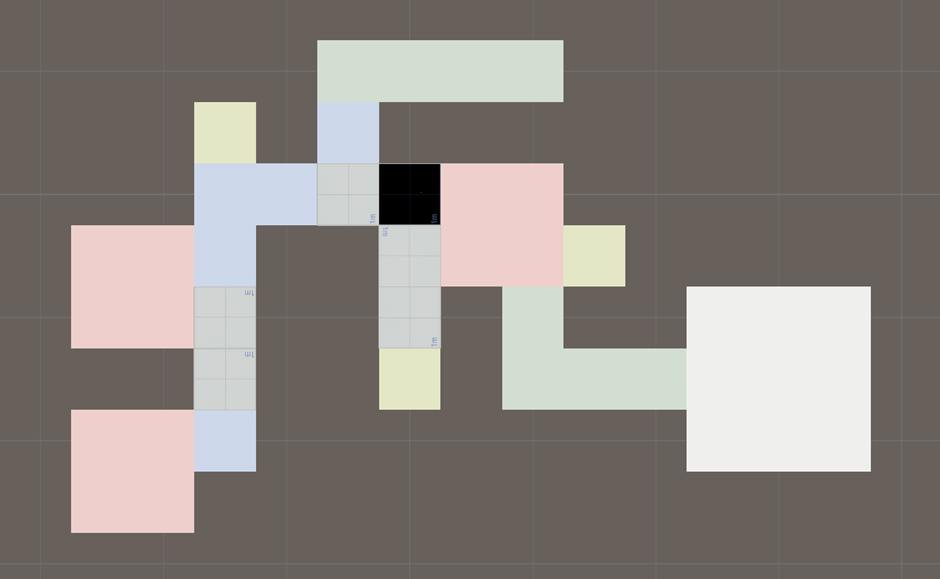
After all this the rooms prefabs themselves are spawned in accordance with information from the grid such as room size, orientation and such. Below is a colour coded top down of a level generated with this system. Colours are as follows.
Black: Starting room 1×1
Green: 2×1
blue/grid: 1×1
red: 2×2
yellow: treasure 1×1
white: boss room 3×3
As each room has its own baked lighting the seams between the rooms would be obvious. To fix this a final pass is performed where aesthetic door frames get added between rooms. This is, what I’m assuming, games like Warframe do as their tiles are most certainly using baked lighting and the lighting on the doors is a different quality all together.
The level part
There were some unique challenges to solve when making the actual prefabs that are being spawned. The main of which is baked lighting. I want this game to be, at least, semi performant so baked lighting is a must. However prefabs and baked lighting don’t work with each other by default.
I found a solution online by Ayfel called PrefabLightmapping which solves the problems with some limitations of its own. Although prefab’s now can have baked lighting this solution entirely doesn’t work with Probuilder which is very inconvenient. Probuilder is an addon that allows flexible and quick level geometry creation within unity. The workaround to this is very tedious but requires exporting a Probuilder object into blender and re-exporting it as an FBX and putting it back in the same place as before. It works, it’s terrible, but I don’t see any alternatives.
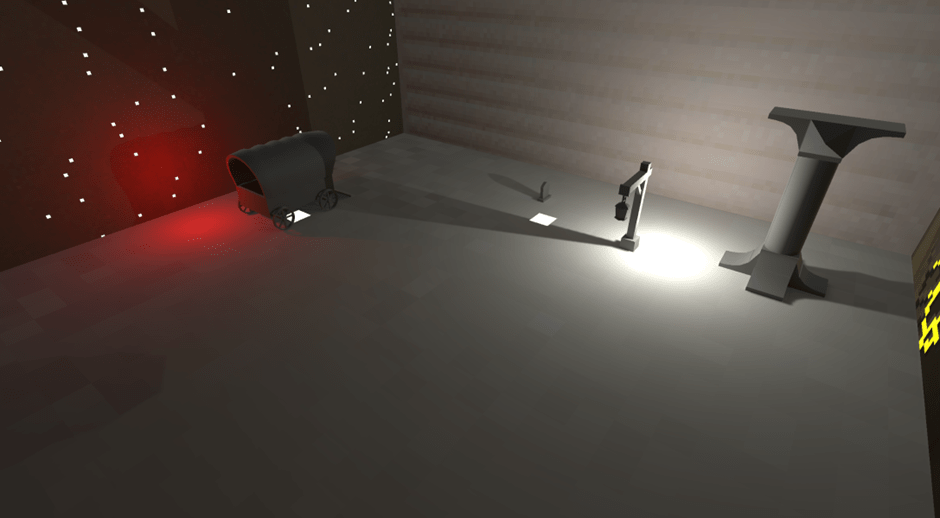
Combat in this game is restricted to combat zones within the rooms. This takes inspiration from class roguelikes like binding of isaac. Because combat zones are already implemented theres already a method is telling whether a player is in a room or not. This gives the opportunity to enable real time lighting but only in the room the player is in. Although not yet implemented this can give much needed lighting to enemy models and weapon viewmodels as well as casting some simple shadows. This should make the game look far better, especially with the reliance on normal maps and the like.
Below is a proof of concept, a prefab with baked lighting with random props and textures casting shadows.
Player Equipment
The player themselves
Movement
The player themselves are a treasure trove of stats to be influenced by item effects and weapons. I’ve already briefly touched on them being my attempt at replicated the vibe of source movement and here I’ll go into further depth.
A never got traditional AD air strafing feeling exactly the same. However, I’ve discovered the potential of W strafing, it serves the same purpose and hits the same itch when landing jumps with it. AD strafing does softly work with certain air accelerations but because this game is a rogue like air acceleration is a stat that can be changed by items. One of the limitations of my system is that it is built on a capsule collider to help with the stair/ramp problem. I’ve elected to not thoroughly solve the stair problem and instead elected to shift that problem onto the level designer (also me). I’ll write more about that when it comes time to design levels because I’ve got strong design philosophies that go hand in hand with that.
The capsule collider is both a limitation of me and the Unity engine. I believe the optimal player geometry collision shape is a cylinder, but unity just doesn’t have a cylinder collider and all the external solutions I’ve tried just don’t work.
Capsules have issues with edges and sliding which feels awful on thing geometry or tight jumps. Box colliders have a strict binary “are you standing on this thing” feeling which gives great feedback to the player and makes controls feel tight. This is contrasted by capsule colliders “well I guess your half on it” which can make acceleration inconsistent and sliding occur. To help compensate the tragic limitation I’ve implement coyote time which is a staple of all good movement systems. Coyote time allows the player to still be classified as “on the ground” when walking off an edge. This only lasts a short amount of time but does wonders in the realm of responsivity. Coincidentally it also helps if a capsule is trying to throw you off an edge.
Aside from neutral movement there are also features on top that make the movement more finessed and robust. Although the default number of jumps is 1 this can be exceeded ad infinitum via items. By basically means I’ve implemented double jumping except the that number can be controlled by items. There is also a short-range dash that will grant invulnerability frames, as it is a staple of the genre. Interestingly, because of the capsule collider if you hit an edge or sloped surface at the right angle you can catapult yourself upwards. Though technically a bug this is a so much fun I’m going to leave it in and it adds skill expression to the movement.
As of now the movement specific variables able to be changed by items are movement speed, air acceleration, jump amount, jump power/height, dash cooldown and dash speed.
Dash speed has a minimum which is a scalar of the movement speed. This is to make sure a dash feels relatively fast regardless of how fast or slow the player can move. But you can always go higher with items. Most stats that can be modified have a minimum value in order to prevent the player from soft locking themselves.
Health
The player must be able to die. But to add depth to this there are multiple types of health. These are kept simple and intuitive because I don’t want to overwhelm the player with different types of health with different damage reduction or health gating and the like. There are currently 3 types of health.
- Health: normal health, you can heal it, it has a cap
- Over health: temporary health, it cannot be healed, when you take damage that section is gone.
- Decay health: another form of temporary health but will rapidly reduce over time until there’s none left.
There is currently no damage reduction methods nor do I intend on adding any. I’m open to change but currently I believe big health numbers and big health damage are more exciting. The point at which I’m expecting to change this opinion is when I start working on healing systems but that’s further down the line.
Damage
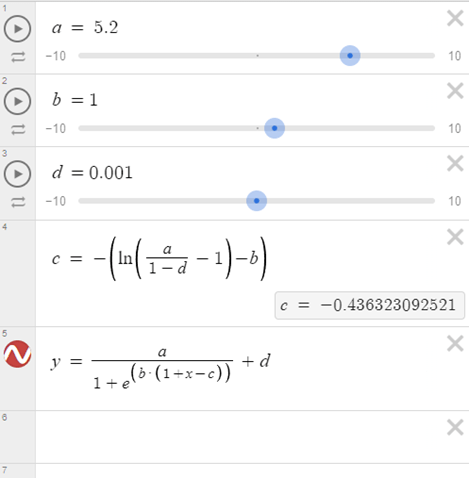
The player must kill. I’ll go further in depth in the weapon section but there are currently only 3 stats that can be changed here. Damage multiplier, pockets and haste. Damage multiplier is self-explanatory, so I won’t go over that and pockets is boring, it’s just the number of weapons you can hold, but haste is a little more interesting. Haste is 1 stat that covers everything to do with how fast a weapon works, fire rate, melee swing speed, reload speed it all falls under the haste umbrella. Due to its 1 size fits all nature and the importance of attacking there is a complicated equation to calculate it. This equation creates both a minimum and maximum modifier with a near linear middle section but diminishing returns or gains as the limits are approached. Equation below where
A = maximum value (slowest speed)
B = an abigious value that changes the gradient
D = minimum value (fastest speed)
Gold
Of the stats gold is the most work in progress. Currently there are 2 stats, gold retention and gold multiplier. Gold retention is how much gold is retained on a failed run (i.e., you died) and might also influence bonus gold if you win a run (I’ll need to do testing with that to see if it’s a good idea), currently I’m leaning on it being a good idea because if your gold retention gets really high (over 100%) you’ll be punished for winning and that’s terrible design. Gold multiplier is fairly self-explanatory, it multiplies the gold you get from all sources. Another goal for a further date is I wish the items the player collects can be converted to gold at the end of a successful run. I’d like to implement this because it makes sense that the player sells the items they gather and depending on how the UI works it can serve as a nice little reflection and downtime at the end of a run which is something I feel not many rogue likes do.
Weapons
The weapon design convention for this game is to be kept very consistent. All weapons have 2 ways of using them, a normal attack and a special attack with a cooldown.
As of current there are 2 types of weapons already implemented. Hitscan guns and melee. The hitscan weapon system is very flexible and creating a new gun’s primary fire is unfathomably easy. By creating a new scriptable object you can determine the damage, fire rate, the amount of bullets per shot (like single shot or shotgun), whether or not it is automatic, the bullet spread, whether or not it needs to reload and if so, how long should it take, Even damage falloff with the minimum damage and the falloff ranges.
The special attack is more complicated to implement. Because they are strictly unique to a weapon, they require a custom script to function. When the special attack of a weapon requires bullets, it becomes a fairly inefficient method of recreating the shooting methods of the hitscan script. This is fine when there are very few special attacks that use bullets but if I plan on adding more it may be worthwhile making a more general bullet function. Alongside this if I plan on having any cross discipline special attacks (i.e., gun uses melee attack) I’ll have to look into that being something more flexible like a namespace or the like.
Melee weapons are a newer system I’ve developed and are still in their infancy. The stats that can be edited on them are standards like damage and swing speed but more interesting the size of the hitbox can be changed on the scriptable object. This gives the different melee weapons a more unique feel. However, this may also make them feel inconsistent so I may revise that system after working with them more.
I’ve yet to implement any special attacks on melee weapons but I imagine the method is the exact same as hitscan weapons, especially since they inherit from the same parent script.
In the future I’d like to implement projectile weapons but as they are not necessary for an MVP I’ve elected to waive their development for now.
Items
Going into this project I had imagined that developing a robust item system would be one of the most difficult parts of development. Fortunately, I was incorrect. Though not a cake walk the item system I have come up with, with the help of a friend, is very flexible. Items can be broken up into multiple categories. Permanent upgrades, these upgrades simply add to a players stats permanently, notably percentage based upgrades will take a percentage of the characters base stats. For example, if the starting character has a very high damage stat by default, the permanent upgrades will be scaled accordingly. Next are items that apply under specific circumstances. The current ones in the game are OnHitItem, which triggers when the player hits an enemy. OnHurtEffect, which triggers when the player gets hit. OnKillItem, which triggers when the player kills an opponent. OnRoomClear which applies when the player clears a combat zone. All the items can stack with themselves giving bonus effects (much like risk of rain 2) and allow for any number of stat changes or special unique effects. With this system the sky really is the limit.
Enemies
Enemy AI is a topic I had very limited experience in before this project. The extents of game AI I had implemented before is the most barebones 2D platformer move left and right and turn around. Before starting anything I researched the standard conventions for outlining AI in games. I wanted something that would put most the onus on design so I could re-shuffle and experiment with various patterns. The two systems I was weighing between were state machines and behavioural trees. The former being something I had looked into previously but not seriously enough to try and implement. The latter being a concept I was vaguely aware of, but not in the context of game AI.
Looking further into behavioural trees as it was the one I had less familiarity with. I quickly determined it was not viable. Everywhere I looked strongly advised against implementing one from scratch and instead picking up one from the asset store. The pricing on the assets I saw were too high to justify purchasing a system that may not gel with me or the AI I planned on creating.
Looking into state machines was an interesting experience. Every tutorial or example I saw used a grossly different setup, some handy looking, others convoluted. During this time I remembered something I had heard a long time ago, something about someone saying that the built in animation system Mecanim can be used as a state machine. Looking into that specifically it looked like the best options as I’ll need to implement animations at some point anyway. Learning how to use Mecanim would be like killing 2 birds with one stone.
Enemy state machines are the most recent topic I covered before writing this post. So far, they feel intuitive and I’ve been getting good results. I’ve created a class that inherits from the base state behaviour template provided by unity that adds additional functions I believe all my AI would use (eg. Walking towards a target). The prototype state machine I’ve concocted meshes fairly well with the navmesh giving quite good results.
Of course state machines are only 1 part of an AI, the next major hurdle was the navmesh. I was very concerned going in, that navmeshes were baked per scene. But fortunately unity has a second type of navmesh components that simply work with prefabs. In fact everything to do with navmeshes just worked. There was only 1 hurdle I have faced so far and it has to do with an asset provided by unity themselves. Navmeshes use navmesh links so agents can jump between isolated sections of the mesh. However by default the agent lerps in a straight line between start and end destinations. Unity provides a script that can change this behaviour in a manner of ways. Namely teleport, parabola and curve.
Teleport was not applicable to the prototype I was making, and parabola was good but gave me little control. So, I tried curve, and curve simply didn’t work. The curve I was setting in the inspector simply wouldn’t save. I looked online about bugs related to curves that were specific to my unity version and I found a reported bug that curves didn’t have the options they were supposed to. Since the options looked helpful anyway, I decided to update my unity to a more recent version that definitely had working curves (according to the bug report). The curve still didn’t work. I tried changing the code that declared the curve, because maybe, something in how it was declared was overriding the curve I set in the inspector. The curve still didn’t work. I tried copying the curve to a different empty script with only 1 public variables and tested if declaring it differently fixed the issue. The curve still didn’t work. Turns out, the problem all along was the name of the variable. The Unity engineers had called the curve m_Curve. Which appears as Curve in the inspector. For some god forsaken reason curves named m_Curve refuse to save. So for anyone reading this do NOT name your curves m_Curve, from testing literally any other name works but not m_Curve. That was my sole issue I encountered with navmeshes so far.
An Issue I know I’ll encounter soon is strafing. it appears navmesh agents prefer to look at their movement destination and not updating position or rotation is strange because the values are tracked but not displayed and when updating is re-enabled the agent will teleport to their appropriate location. But that’s a problem for another day.
One problem I have with navmeshes is how efficient they pathfind. A strange issue I know but this leads to multiple agents essentially forming a single file line when pathing towards a position. The only issue with this is it looks bad. To solve this problem I devised multiple types of chase. In the state machine if an AI wishes to path towards the player but is outside a certain range the navmesh will path to a random position in a torus or donut around the player, as the agent gets closer the torus shrinks until, when close enough, the agent chases the true position of the player. The position in the torus changes position after a random time interval to give the pathing a more variation and makes the AI look indecisive. When test with a larger amount of AI the AI form a sort of spread-out cloud or mass as they approach the player. I deem this a success.
Next is what happens when the AI finishes approaching the player. For this I used Sub-state machines for attack patterns, a nice organisational way to essentially folder different logic. This worked without any issues except minor confusions about the exit and up node.
As this is what I was currently working on next in the agenda is Dummy animations. I plan on having the enemy damage box turn on based on animation events and for that I need dummy animations. This should be fairly simple to implement but as its the system I’ll be using for all enemies I’ll need to take my time and it as easy and replicable as possible.
What’s next?
First things first are the dummy animations for attacks. After that I’ll begin grey boxing some tile layouts so I can establish a pipeline for that and get a pre-emptive playtest going. I’ll try posting more frequent and more importantly, shorter, devlogs after this. Maybe every week, maybe every other week, depending on how much there is to talk about.
At the very least, if this game turns out to be a wash, the things I’ve learned and the methods I’ve developed will be applicable and useful to other projects.

Leave a comment