New this week
This week I learnt how to use the basics of Blender’s material system and how it integrates into Unity. Spoiler alert, not very well. I also learnt the basics of Blender animation system and created some animations for the first enemy. I improved my state machine creation pipeline and improved the player damage functions to be more extensible.
Materials
From what I have learnt about the Blender material system very few parameters carry across to Unity well. The most important ones such as albedo and normal maps seem to work fine, if not a little finicky.
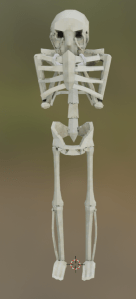
I went through 3 iterations of how to apply materials to the model. Initially I gave an individual material to every separate bone part (eg. Ribcage, Upper spine, skull etc.) but determined that this was extremely inefficient both computationally and time wise.

The 2nd iteration which I only partially got through was grouping all models connected to a single bone together and using 1 material per bone. This drastically reduced the number of materials as most the upper body could be combined as the arms on the model do not move. However, this was still too many materials for my liking. Up until this point I was under the assumption that separate models had to have separate materials, as this is what I have witnessed in practice. The reason my model uses so many individual models is because of the skeletal nature. A normal rigged model would have mesh deformation around joints but because bones don’t tend to deform they had to be separate objects strictly childed to the appropriate bones. I had discovered you can unwrap multiple objects onto the same UV map which allowed me to combine all bones into 1 material. This is the third and final iteration. The final model still has 2 materials because of the metallic shackle and Blender’s incompatibility with Unity’s metallic properties requiring a material override once imported.

The current material pipeline consists of unwrapping an object, manually most the time as the smart unwrap usually causes jarring seams in visually important areas. Baking an ambient occlusion map in Blender’s material system. Creating a texture in photoshop and importing that into Blender’s material system. Re-baking the ambient occlusion and the texture together to make a single image texture. Creating a normal map in photoshop using a deprecated system. Importing that into Blender with appropriate conversion node. Exporting the FBX into Unity and importing the normal and new final texture into the same file. Unity automatically recognises the image textures and applies them to the model’s internal materials appropriately. In the case of metallic textures the using the override material import setting is necessary along with a standard Unity material.
Going forward I am probably going to research a material plugin for Blender that is more compatible with Unity. However if I cannot find one I will like keep using this workflow because it allows for faster iteration and review.
Animation
This was my first foray into animation. I went better than expected because of the somewhat sensible rig and IK controllers. It is clear from the animations that I lack some important knowledge movement principles and shifting weights and whatnot as I just couldn’t get some animations to look right. However, for a first attempt I am very happy with the result. This is further bolstered by the model itself. Being a skeleton a little bit of uncanniness of the animation is welcome. My biggest issue I had with animation was using the Graph Editor. I had never heard of a graph editor before, and its layout is fairly unreadable for someone who doesn’t know what their doing. Using it was a necessity though as the default interpolation doesn’t really work with explosive motions which accelerate and come to an abrupt stop. Examples of this would be a foot hitting the ground or a hyperextension of a limb. Something I really liked in most of my animations is the little swaying or bobbing of the skull. Below is a slideshow of all the unique animations.

State machines
The final task of the week was to implement all the above into a working enemy AI. I reused a lot of the states from the initial practice AI because I built that with this NPC in mind. I plan on reusing a lot of the generic stuff from that AI again as well as stuff like a wander and a chase are rather generic. Of course some of the values like damage and knockback are grossly over-tuned but this is to ensure everything is working as intended.
Miscellaneous
On the side I improved the player knockback function which allows weapons and enemy AI to push the player around more reliably. Although knockback in games is generally frustrating but I believe if there’s solid air control and you don’t restrict the air control when getting knocked back it takes the edge off the frustration.
What’s next?
I completed more than I was expecting this week which means I skip straight into a basic UI. I’ve always had a trouble with UI so I’m not expecting to enjoy this week but hopefully it’ll go smoother than I expect.

Leave a comment